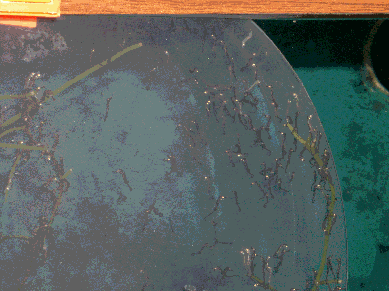
 Home Grown Hippocampus Erectus at 22 weeks
I would like to preface this article by saying that it may
be a bit premature, I had planned on waiting until the system
had been in operation longer and I had closed the life cycle
before writing it. However the results so far have been extremely
promising, I believe I am very close to that goal and I have
been asked for details of the system.
I have organized the information into three sections; The
System, The Nursery and Husbandry. I hope you will find it
helpful to your own endeavours.
The System:
The system consists of one 50 gallon, three 40 gallon and
five 10 gallon glass aquariums, a plastic tub serves as a
filtration sump and there is a 125 gallon acrylic reservoir
at the lowest level. The larger tanks are drilled and plumbed
with PVC pipe and the ten gallon tanks are connected in series
by ‘U’ tubes. The total actual water volume is
300 gallons when the reservoir is full. There are two levels
along the main wall and the tall 50 sits off to one side to
create an ‘L’ shaped layout. There are three pumps;
one for each of the two main rack levels and one for the 50.
All water returns to the filter sump where it passes through
a 100 micron filter bag. There is a protein skimmer in the
sump as well. There is live rock scattered throughout the
system and some foam blocks in the sump for bio-filtration.
The filter sump has an overflow to the reservoir below, and
a small pump returns water to the filter.
Most of the tanks are bare bottom for easy cleaning. There
is one ten gallon tank with an undergravel filter and about
2" of aragonite substrate for added biological filtration.
Each tank is siphoned clean twice daily. There is no reason
to replace the water since it is automatically replaced from
the reservoir. Once a week or so I pump the reservoir dry
and fill it with new water. This represents a water change
of about 33% every seven to ten days. It is of course necessary
to top off the reservoir with fresh water to make up for evaporation.
I keep the system at specific gravity of about 1.024.
Lighting consists of a continuous strip of normal output
fluorescent fixtures at each level. I use GE Chroma 50 full
spectrum lamps which burn 14 hrs. per day. There is a table
lamp in the room that provides a brief dawn/dusk simulation,
more of a shock buffer really. There are red lamps in the
rooms overhead light fixture for working in the room at night.
There are regular aquarium heaters in each tank to maintain
the water temperature at a constant 77 degrees F.
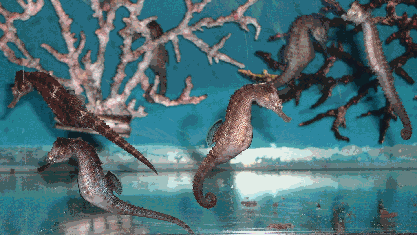
The system is devoted strictly to seahorses and very lightly
stocked. The only other livestock is a pair of Corythoicthus
sp. pipefish and a lone male orchid dottyback who lost his
mate several months ago. There is no clean up crew other than
an assortment of bristle worms and other small critters that
came in with the live rock. The walls of every tank are covered
with copepods and there are small mysids throughout the system.
The design is such that it easy to maintain excellent water
conditions and very easy to keep clean. The biggest drawback
is that all my eggs are literally in one basket. I live in
constant fear that I could lose everything if something goes
wrong. For this reason I have decided to move some of the
juveniles to a tank in another room to reserve as broodstock
should anything happen.
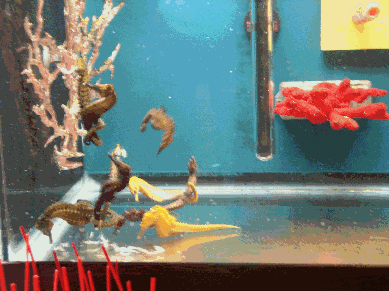
 The fish room
The Nursery:
Prior to breeding seahorses I was working with two shrimp
species, L. amboinensis and L. wurdmani. I was constantly
trying different ideas to concentrate the larvae and food
while still allowing a flow of fresh, clean water through
the nursery. When I began with the seahorses I learned about
the "classic" fishbowl nursery and over time modified
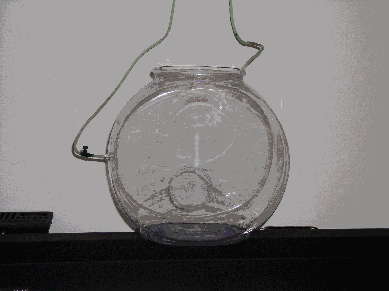
it to fit into my system. I use plastic bowls that are easy
to drill. There is an airline connected about half way up
one side that creates the circular flow which keeps fry and
prey in suspension and prevents them from congregating at
the surface. This is the usual set up. To this I added a water
intake at the top and opposite side of the bowl. Water enters
the bowl via a siphon line from another tank at a higher level
and creates a current that is in sync with the direction of
flow produced by the air. At the back of the bowl I drill
a 2" hole that is covered with 500 micron mesh screen.
This allows water to exit the bowl carrying away detritus
and uneaten food. The whole thing is immersed into one of
the lower aquariums and held at the desired level by a plastic
clamp, although I have built shelves out of eggcrate that
work just as well. You can see one in operation at the right
hand side of the photo above. Depending upon the rate of flow
and the amount fed, this usually gives the fry about an hour
to eat before the last of the baby brine shrimp used as food
are flushed from the nursery. This design provides a constant
flow of clean water to pass through the nursery and eliminates
the need to siphon out uneaten live food. Detritus and dead
bbs will settle to the bottom where they are easily siphoned
out with a length of rigid airline and some flexible tubing.
The one thing I don’t like is that the fishbowls have
an uneven bottom with a ridge running around the perimeter.
Fry can be hard to see in there and may be sucked up accidentally.
I recently purchased some polyester casting resin and plan
to pour a ½" layer of this into the bottom of
the bowl which should create a nice flat surface and make
it easier (and safer) to clean.
This nursery works very well for my erectus fry as they tend
not to snick air at the surface and spend much of their time
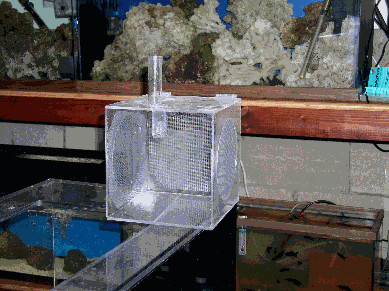
lower in the water column. Another design that might be better
for those fry that have a long pelagic stage is total submersion
which creates a nursery that does not allow the fry to reach
the surface. For this I made an acrylic cube with large screened
holes for water flow. The cube is 8 X 8 X 8" and sits
nicely in a ten gallon tank. No airline is added but a small
powerhead placed in the tank (not inside the nursery) ensures
plenty of flow through the cube. There is a 1" tube that
extends above the water surface for feeding or adding fry
and a small hole in the lid for inserting a cleaning siphon.
These are plugged with cotton filter floss when not in use.
The lid is hinged for easy cleaning between broods. This "shark
cage" is more difficult to maintain than the fishbowls
so I don’t use it for erectus anymore, but it stands
ready for that load of reidi that I’m sure I’ll
run across sooner or later!
Another design that should work equally well for pelagic
fry is Liisa Coit's "critter keeper" nursery. I
know first hand that she has had good success with it. I believe
you can find it in her photo album on photoisland.com.
Husbandry:
This is a well covered subject and I am certainly no expert
so I will simply share with you my practices. I siphon detritus
from each tank twice daily just before feeding. I wipe the
bare bottoms clean when they need it and occasionally clean
the front glass. I rarely clean the back or sides as they
are covered with ‘pods and I feel that a moderate growth
of algae is probably good for the system.
As previously mentioned, water changes are accomplished by
the daily removal of water from cleaning and regular replenishment
of the reservoir tank.
I feed all the seahorses twice daily at roughly 6–7
a.m. and 6–7 p.m. I would like to feed the fry more
frequently but sadly, I have to work for a living so that
is not possible. I culture and fortify bbs (artemia) as outlined
in The Plankton Culture Manual and use both Selcon and LiquidLife
as enrichment products. As soon as possible (about 8 weeks)
I get the fry started on Hikari mysis but continue adding
the bbs for several more weeks. As the fry grow I make the
switch to PE mysis and that is what I feed the juveniles and
adults.
Conclusion:
The above information is not the result of any long term
effort or continued success. My horses just began breeding
last June and I have only reared three broods. There was a
fourth, actually the first brood, but I lost that to "operator
error" if you know what I mean. I have been fortunate
in that I have not had to deal with disease or any other disasters
thus far, I’m sure there are still many hard lessons
ahead. I wish I could say that this is THE way to go but only
time will tell. At this point I have a 21% survival rate from
the three broods at three, four and five months. That’s
42 happy, healthy and frisky seahorses! I now have another
275 fry and will try my best to bring them through.
I hope that you find some of this helpful and wish you all
good luck.
|